Sunday, September 29, 2013

Trick or Treat at Lacy Sunshine's Digs


We have a fun one for you this time around! Well, really, all the challenges are fun but this one is perfect for the season that is going to be upon us very quickly. Our Lacy Sunshine challenge is “Trick or Treat with Stitching, Faux or Real.” See, FUN, FUN, FUN, FUN!

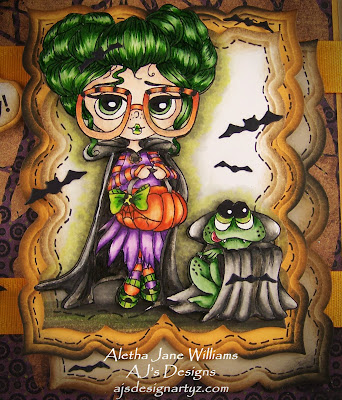
For my project I was given the cutest little Lacy Sunshine digi, “Eleanor & Pickles, Ve Vant Candy.” I think that Heather knew that I usually do stand-alone images, or maybe not, and that’s why I got this one. She challenged me, or I challenged myself, whichever. But I was challenged, and I’ve got to say that I loved coloring this little duo. When I can color green hair, I am always game. You can find Eleanor & Pickles in Heather’s Seasonal section.


I did print the image twice. I like to have a backdrop of the image, and then a fussy cut image to pop up from that backdrop. They were first colored with Copics, and a few highlights with Spicas and a white gel pen were added. The backdrop was colored and cut with Spellbinder’s Labels 23.

Copics used:
Skins: E000, 11, BV000
Hair, Eyes, & Pickles:
YG61, 63, 67
Bow, Shoes & Pickles Eyes:
YG21, 23, 25, 67
Dress, Sleeves, & Socks:
YR00, 12, 14, 18;
V000, 09, 12, 15, 17
Pumpkin & Glasses:
YR00, 12, 14, 18


Eleanor & Pickles was mounted on two more Labels 23 cuts with Stampin’ Up!’s cardstock in Marigold Morning and Crumb Cake. My faux stitching was done around the embossed areas of the die cuts. I had some chipboard bats that I added. I also added some Memory Box Bunch of Bats (available in the Lacy Sunshine shop) die cuts to fill in some of the empty space. You would not believe how much I am using this little die. “Ve Vant Candy” was computer generated and added after everything was assembled.


There will be an image available for you to use for this challenge. All the details will be in the Lacy Sunshine challenge blog. After you have created your little piece of art for our Trick or Treat challenge, please stop by our Lacy Sunshine Facebook group and share it with us.

Thanks for dropping by! If you have any questions, please don’t hesitate asking.
Aletha Jane

Friday, September 27, 2013

New Jewels/Glitter Challenge at Dilly Beans


It’s Friday and that means a new challenge at the DillyBeans Challenge Blog. Our theme this week is “Jewels/Glitter.” We want to see jewels or glitter on your project, along with a Dilly Beans image. That’s right, you need to use a Dilly Beans image to be considered for the weekly prize.

For my little piece of art I chose “Amalia’s Daisy Crown.” I colored Amalia with Copics and then die cut her with Spellbinder’s Card Creator (designed by my friend Cindy Echtinaw) A2 Curved Matting Basics A. Next came the Mowed Lawn Distress Ink around the edges and the glitter on her wings. Her daisy crown was fussy cut, colored with Copics, jewels were added, and now she has flowers in her hair. Did you know that Megan has 31 Amalia images? Something for you to create with every day.


Copics used:
Skin: E000, 11, BV000
Cheeks: R22
Hair: E29
Dress: YG13, 17, 21, 67
Flowers: R21, 22, 24, 276, 29;
Y27, 32, 35, 38;
YG13, 17, 21, 67
Arms and Legs: Red & Yellow glitter pens

Other supplies:
Cardstock: Stampin’ Up! in Cherry Cobbler & Old Olive
Die-cut flowers: Spellbinder’s Rose Creations
Ribbon and Glitter: my stash


I hope that you play with us this week. After you have entered in our Jewels and Ribbon challenge, head over to the Dilly Beans group on Facebook and show us your little piece of art.

Thanks for stopping by! If you have any questions, please don’t hesitate contacting me.
Aletha Jane
Dilly Beans DT

Friday, September 20, 2013

Blog Hop with Cindy Echtinaw and Spellbinders


Happy Saturday wherever you are in this wonderful world of ours! If you hopped from Cindy’s blog, you are on the right track.


Welcome to our first blog hop for Cindy Echtinaw Designs (CED) featuring Spellbinder’sCard Creators. These amazing dies were designed by our own fabulous and beautiful Cindy Echtinaw.


I know that you will love these dies. Cindy has designed these for A2 and A7 size cards. AND she has also designed the Layer Creator to use with these Card Creator dies for perfect placement. This tool is wonderful! Please check it out.

Please visit these blogs to view other Amazing Projects
created using the Newest Spellbinders Release dies.
Leave a comment for your chance to win a set of
 Pearl Effects Card Creator Dies from Cindy Echtinaw Designs &
a 2nd winner will receive Tile Works direct from Spellbinders Paper Arts!!!!!

Aletha Jane Williams (you are here)

2 Random winners will be drawn on September 30th

For my little project I was assigned the “Tile Works” Card Creator dies. I love them! I really love all the Card Creator dies! This style will go with just about anything. I am already planning on using them again with an Asian themed project. I die cut with red and yellow cardstock, and then used Gathered Twigs Distress Ink on the embossed areas. This really made the design pop.


It has been a very long time that my Copics colored a Magnolia stamp. These little charmers were the first stamps I used when I got hooked on Copics. I am going to call this one “Tilda with Mended Heart.” She is a cutie.

Copics used:
Skin: E000, 11, BV000, R20
Hair: E50, 37, Y21, 26, YR24
Smock, hair bow, shoes, heart:
R20, 21, 22, 24, 27, 29
Dress, socks, ribbon around heart:
Y11, 13, 15, 17, 26
Background: W00, 0, 1, 2, 4, Y11


Tilda was stamped twice, one for the central image and the second for the backdrop. The image with all colors was fussy cut first. The image for the backdrop was die cut with Spellbinder’s A2 Matting Basics B, designed by Cindy also. Before placing the first image on the backdrop, I distressed the edge with Gathered Twigs Distressed Ink.


Now it’s time for all the assembly. I am happy to say, it all fell into place. I centered the first red Tile Works die cut on the base, and then overlaid that with ribbon and tatting. Then the yellow and Tilda layers were next, added a bow and red and yellow roses. It is ready for someone who has a heart that needs mending.

I am thrilled that you dropped by. Your next stop is Christi’sblog. Happy hopping and I will see you soon.
Aletha Jane

Challenge time with Dilly Beans


Are you all ready for the next challenge with Dilly Beans? This next challenge is easy peasy, use “ribbon.” Remember that you must use a Dilly Beans image plus the ribbon on your little piece of art to enter. Your entry will be in the running for the prize of three digis of your choice.


For my project I chose “River Framed.” Isn’t she a lovely one? Those eyes and the flowers in her hair just say something about her personality. Before I started coloring with my Copics, I first picked out some designer paper from Basic Grey’s Out of Print collection. These papers were perfect for the colors that I felt River deserved. I cut them to size, distressed with Peacock Feather Distressed Ink, and finally mounted on Kraft cardstock and Stampin’ Up!’s  Taken with Teal.

Copics used:
Skin: E000, 11, BV000
Hair: E51, 53, 43, 57, 49
Dress: BG70, 57, 72, 75
Leaves & Eyes: YG13, 17, 21, G29
Flowers: R81, 83, 85, RV69, and
YR000, 02, 09, 16, and
BG70, 57, 72, 75
Background: W0, 1, 2, YR000, YG21

My ribbon is from my stash, and luckily was the perfect color. My fun flowers were accomplished by using the four smallest dies from Spellbinder’s Rose Creations. I then got one of my favorite paints, Viva Décor 3-DStamp Paint, in lime green and covered the die cuts. After everything was dry, I shaped the flowers, assembled, placed them wherever, then added the teal flat backed pearls. Now my little piece art is complete.


After you have picked out your perfect image in Megan's Dilly Bean's shop, come join us this week for this fun challenge. After you have entered, come show us your project at our brand new Facebook group. We would really like for you to “Like” our page so you can stay up to date on all the happenings at Silly Dilly Beans. Dilly Beans Inspiration blog has some fantastic sugar skulls on display, check them out. See, there is a lot happening at Dilly Beans, never a dull moment.

Thanks for stopping by! If you have any questions, please contact me.
Aletha Jane
Dilly Beans Design Team

Sunday, September 15, 2013

Paris High Fashion with a Challenge


Welcome to a new week! Mema’s Craft Challenge blog has a month long challenge featuring Rick St. Dennis MFA (RSD) digital images. Today is the mid-point for this challenge. The theme is “Lace & Feathers,” a very fun theme and right up my alley.

This challenge is perfect for one of Rick’s “Hat Ladies,” located in his Etsy shop, under the section “Lovely Ladies.” He has some beautiful “Lovely Ladies” listed. They are very detailed oriented, fun to color, and the facial expressions are so alluring and innocent. I am sure that you can find something to your liking, be it main stream, or on the darker side of life.


For my project I chose “Paris High Fashion.” Paris High Fashion was first printed twice and colored with Copics. One image will be the backdrop for the main image. The backdrop was die cut with Spellbinder’s Labels 10 and Peacock Feathers Distress Ink was sponged all around the edges. The main image was fussy cut and mounted on the backdrop. These two pieces were mounted on another Label 10 die-cut.

Copics used:
Skin: E000, 11, R20
Hat: BG10, 13, 15, 18
Collar: RV93, 95, 69, R56
Fur Collar: C1, 3
Background: W0, 1, BG10, Blender
Accents: Gelly Roll White & Spicas


Other Supplies:
Stampin’ Up! cardstock: Tempting Turquoise & Rich Razzelberry
Designer Paper: Kaiser Craft Gypsy Sister’s Collection
Lace (tatting): my stash
Pearls: my stash
Feather: Michaels

For this project I want to add that the designer paper was chosen first. I usually color first and then choose my paper, but not this time. This Gypsy Sister’s Collection is beautiful. The off white designs in the base layer is velvet, just GORGEOUS!


Head on over to Mema’s Craft Challenge for your chance to win some Rick St. Dennis images. After you have entered, and your little piece of art used a Rick St. Dennis image, please come join our groups on FacebookGroup and at Paper Craft Planet. We would love to see you.

Thanks for stopping by. If you have any questions, please don’t hesitate contacting me.
Aletha Jane
RSD Elite Design Team

Friday, September 13, 2013

Challenge Time at Silly Dilly Beans


Happy Friday to everyone! This is my first post as a designer at Dilly Beans and we have a new challenge for you. We want to see your washi tape on your project. We do require you to use a Dilly Beans stamp, which is not too hard, on your little piece of art. After you have colored your image, go crazy with the washi tape.

I have a confession to make, washi tape has not been on my list of must haves. But after this challenge, and using the tape that I have, I NEED more. (Notice the word need, and not want. LOL) This tape was a lot of fun to use.


For my little project today I chose “Unicorn Girl’s Heart” as my main image. I love the fantasy lore behind Unicorns, and when combined with a little girl, priceless. She is wearing her heart on her horn, not her sleeve. After my coloring was complete, I die cut her with Spellbinder’s classic squares, then mounted her on Stampin’ Up!’s Elegant Eggplant and Cherry Cobbler. I guess you probably know that my favorite color combo is red and purple. ;o)


Copics used:
Skin: E000, 11, R20
Hair: BV01, 02, 04, 08
Dress & Heart: R21, 22, 24, 27, 29, 89
Background: W00, 0, 1, 2, BV000

My washi tape came into play with my square piece behind Unicorn Girl. I die cut a larger square and then placed my tape on that cardstock to make the secondary background. My designer paper is a scrap from my box, under my art table.


After that was all put together, it still needed something. I decided against flowers, so why not circles to break up the squareness (Is that a word?). That worked, at least in my books. Added a few black pearls from my stash, and I was done.

I hope you join us for this challenge. Check out the Dilly Beans store for the perfect image. After you enter our challenge, we would love to see your little piece of art in our brand new group on Facebook!

Thanks for stopping by. If you have any questions, don’t hesitate contacting me.
Aletha Jane

Wednesday, September 11, 2013

Variations Week at SPS with Conie Fong


I hope everyone is having a great week. Are you ready for Halloween? After viewing Sweet Pea Stamps (SPS) Design Team blog you will definitely be in the mood.

It’s variations week at Sweet Pea Stamps and one of Conie Fong’s cute images was chosen. My project is a 5¾” finished card with “Priscilla,” designed by Conie Fong, as the main image. You can purchase this cutest of witches in digital format or as a rubber stamp, whichever one is your preference.


Copics used:
Skin: E000, 11, R20
Hair: Y21, E39, 57, 97, 99
Cat, Hat, and Shoes: C00, 1, 3, 5, 7, 9
Dress, Ribbon, and Hat Bands:
V20, 22, 25, 28, and
YG13, 17, 21, 25, 67, and
YR00, 12, 15, 16, 18
Broom: E41, 43, 44, 47, 49
Background: W0, 1, 2, YG21, YR00


After Priscilla was fussy cut, I then mounted her on my second print out, which was die cut with Spellbinder’s Wavy Rectangles.  Those two elements were then mounted on the largest wavy rectangle in Stampin’ Up!’s (SU) Only Orange cardstock.


I really had some fun with this one. First my base is composed of more of the only orange cardstock and SU Witch’s Brew designer paper.

I used several dies to complete my base for Priscilla. My corner dies are from Memory Box Small & Creepy Web Frame. I cut the webs off the frame, added some glitter, and parked them in my left corners. See those little bats? Those are die cuts, itty bitty die cut bats, from Memory Box “Bunches of Bats.” I am going to get a lot of mileage out of the die. I added Cheery Lynn’s Fanciful Flourish to get a little more green in the mix. The flowers are from my stash.


We, at SPS, have so many places that you can visit for inspiration. Please stop by SPS Design Team blog every day to jump start your creative mojo. After you have created you little piece of art with one of SPS’s stamps, come share it with us at our new Facebook group. We have a weekly question. To win a digi of your choice you need to join our group and comment on the post, easy peasy!  Also on Facebook, we have our Sweet Pea Stamps page with all the happenings.

We also have a monthly challenge at “One Sweet Challenge.” Our theme this month is use brown, yellow, orange, and red. Never a dull moment in Sweet Pea Stamps Land! Lots of fun places to be!

Thanks for stopping by. Hope to see you again. If you have any questions, don't hesitate contacting me.
Aletha Jane
SPS Design Team

Saturday, September 7, 2013

RSD Newsletter Freebie Time

It’s Saturday, and this was supposed to post at 2 a.m., but something went wrong. Probably me, not really looking at what I was doing. Anyway…

It is time for all of Rick St. Dennis MFA Elite Design Team (RSD EDT) to show you what you are missing if you have not signed up for Rick’s monthly newsletter. How do you sign up? Click on his blog page “Email List” and sign up. All the instructions are there. 


I want to invite all of you to visit our blogs, Sparkle& Glitter and Airless Chambers. On each blog you will see the talented coloring and creative projects that RSD’s EDT accomplished with these fun "Back-to-School" images. I invite you to also to take a visit to at Rick’s blog too. Now we know what his inspiration was behind the illustrations, such a young and aspiring artist.

 I would like you to meet Buddy.
Copics used Buddy:
Skin: E000, 11, R20
Hair: E25, 31, 50
Vest: R21, 22, 24, 27, 29
Slacks: E81, 84, 87, 89
Shoes & Books: C1, 3, 5, 7
Apple: R02, 05, 08, Y13,
Leaves: YG21, 23, 67
Eyes: B21, 24, 26
Background: W0, 1, 2, and R02, Y13

 And here is Bad Bitsy.
Copics used for Bad Bitsy:
Skin: E000, 11, R20, 22
Bows, Socks, Vest: B21, 24, 26
Skirt and Shoes: C00, 1, 3, 5, 7, 9
Hair: E41, 43, 44, 47, 49
Background: W0, 1, 2, 3

Buddy and Bad Bitsy are available at a very special Back-to-School price of $4 for both images. If you are one of the lucky people that receive Rick’s newsletter, I hope that you will share with us your little piece of art. The places to join are Rick St. Dennis MFA Fans & Friends on Facebook, and on Paper Craft Planet. If you do not want to miss October's Newletter Freebies, please sign up.

Thanks for stopping by. If you have any questions, please don’t hesitate contacting me.
Aletha Jane
RSD Elite Design Team

Weekend Special at Sweet Pea Stamps


WEEKEND BACK-TO-SCHOOL SPECIAL!!!
Save 20% on all your rubber stamp purchases
this is good for Friday, Saturday & Sunday ONLY!

Thursday, September 5, 2013

Halloween is Just Around the Corner


Happy Thursday to all. Just one more day and the weekend will begin. I’m really looking forward to it.

I would like to introduce you to Witchy Bear, designed by Rick St. Dennis MFA. Isn’t she the cutest little witch you have ever seen? She is available at I Brake for Stamps in a full sheet of the cutest bear rubber stamps that you will ever own. I am a little biased on the cuteness. All of Rick’s images make you want to grab them and color. I am sure that you have other teddy bear stamps, but I loved coloring this little witch with my Copics.


I printed Witchy Bear twice, colored one, and used the other one for a backdrop. The backdrop was then die cut with Spellbinders large circle die, used Copics for the background. After the Copics, I distress the edges with Gathered Twigs DI. This backdrop was then mounted on Spellbinder’s Scallop die-cuts in SU’s Really Rust and True Thyme cardstock. After finishing with the coloring on the main image, I fussy cut Witchy Bear and mounted her onto the backdrop.

Copics used:
Bear: E21, 23, 25, 29, R20
Dress: V000, 09, 12, 15, 17
Sleeves & Hat Bank: YG23, 25, 27, 67
Apron: YR00, 12, 15, 16
Hat & Spider: C1, 3, 5, 7, 9
Broom: E31, 35
Background: W0, 1, 2, 4, and
YG21 & YR00


Now it’s time to assemble the card. The designer paper is from my stash. I trimmed everything to size and added a few bats. The one in the bottom right corner is from Alpha Stamps. I need to order some more, you can never have enough bats. I have also die cut the smaller bats from a Memory Boxes Die “A Bunch of Bats.” The spider web is one of my favorite dies. It’s from Cheery Lynn Designs. After I cut it out, I used Viva Décor 3-D stamp paint in copper. Everything is assembled and it still needed something. I went to my sticker stash and found the pumpkin and wheat stalk. Now it’s done.

That’s it for today. I hope you head over to the Sparkle & Glitter blog and check out the other Elite Design Team members' awesome little pieces of art.

Thanks for stopping by. If you have any questions, please contact me.
Aletha Jane
RSD Elite Design Team

I'm Moving!

I am moving my blog to my website at AJ's Design Artz . I hope you stop by!